
Friday, December 16, 2011
What is One Note in Microsoft Office?
If you're using Microsoft Office 2007 or a later version, you may have noticed a new program called, One Note. This is a new program in the Microsoft Office Suite. A lot of my clients have asked me about it, so I thought I'd provide some information here about One Note.
Unlike Microsoft Word (which is a word processing program), One Note was designed to help you track and organize important notes. Many of us are often scribbling notes on various pieces of paper, which often get lost or are difficult to keep track of. One Note is a digital program designed to replace all those notes scribbled little pieces of papers. And even better, it helps you organize your important notes so they're always at your fingertips.
You can watch a demo video showing how One Note works by clicking here.
For more information about One Note, click here.
Thursday, December 8, 2011
Beware of Fake Adobe Software Update
Although I typically tell my clients it's okay to update Adobe when they see a notification to do so, I want to issue a caution regarding those updates. There is currently a FAKE update message making the email rounds and folks definitely want to IGNORE and DELETE this warning.
Legitimate update notices show up in the taskbar (you'll see a little message window down in the corner of the screen by the clock). It's OKAY (and advised) to respond to these messages and update your Adobe software.
However, NEVER respond to update notices received via emails. These are almost always scams. And of course, if you're ever in doubt, don't respond to messages asking you to update. Instead, go the software application's website and download the latest version of the software and install it. This will ensure you're always updated and eliminate the risk of getting caught in a scam.
Monday, November 21, 2011
Norton Internet Security for 5-PC's
For the last few years, Norton has offered a 3-PC license (meaning you could legally install Norton Internet Security on 3 computers). This is a huge help to folks who own more than one computer. And as amazing as it sounds, many users now need a 5-pc license (especially if you have kids in the house with laptops)!
Buying Internet Security software for 5 computers can get expensive. But thank to Norton's 5-PC license for Norton Internet Security, this is no longer a problem.
A single PC license for Norton Internet Security costs $30-$40 (depending on where you buy it)
The 3-PC license for Norton Internet Security costs $70
And the 5-PC license for Norton Internet Security only costs about $109 (which is a huge savings).
To downnload the Norton Internet Security 2012 - 5 User Pack, click here.
Uninstalling Skype
If you're no longer using Skype or are having trouble with the program, you want to uninstall it. The steps below will help you uninstall Skype from computers running Windows.
If you still wish to use Skype but find the program isn't working anymore or freezes up on you. Then you may wish to try uninstalling it and then reinstalling the latest version of Skype. This may fix the problem.
Once Skype is uninstalled, you can reinstall the latest version if you like. To download the latest version of Skype, click here. You'll be asked to log in to your existing Skype account or create a new one.
For more information about using Skype, click here.
If you still wish to use Skype but find the program isn't working anymore or freezes up on you. Then you may wish to try uninstalling it and then reinstalling the latest version of Skype. This may fix the problem.
To uninstall Skype from computers running WinXP:
- Click the START BUTTON and then CONTROL PANEL
- Open ADD OR REMOVE PROGRAMS
- Scroll own the list (when it becomes available) and find Skype
- Highlight Skype (single-left click) and then click the REMOVE button (and follow any prompts); Reboot the computer if asked to.
To uninstall Skype from computers running Windows Vista and 7:
- Click the START BUTTON and CONTROL PANEL
- Open PROGRAMS and FEATURES
- Find Skype in the list of programs and highlight it
- Click the UNINSTALL or REMOVE button
Once Skype is uninstalled, you can reinstall the latest version if you like. To download the latest version of Skype, click here. You'll be asked to log in to your existing Skype account or create a new one.
For more information about using Skype, click here.
Setting Up Skype
Skype is a great tool that allows you to video chat or talk to others anywhere in the world ... and it's FREE! Skype has been around for years, but more and more people are catching on to it now that they have web cams built into their laptops.
Although you don't need to have a web cam to use Skype, it is recommended. Without the web cam, all you can do is chat over the internet as if you were talking on a telephone. So at very least you will need a microphone connected to your computer to chat. And if you prefer, you can purchase a special headset/microphone combo specifically designed to work with Skype.
Webcams aren't that expensive these days and having one allows you to actually see the person (or persons) you're chatting with real-time (and vice versa). The cool thing about this is that it's almost like being there in person! Many of my clients feel as though they get to watch their distant grandchildren grow because of Skype.
If you have a lot of relatives and friends that live in other states or counties, you'll really enjoy Skype. And it's easy to install and set up.
Installing Skype is pretty easy. You'll have to set up a free account first, then download the software and install it. I recommend keeping notes of the username and password you setup for future reference. In addition to the free account, Skype also offers a premium account for a small fee. You can read about the differences in accounts on the Skype website.
If you previously had Skype installed and can't get the program to work anymore, you might want to uninstall Skype and then reinstall the latest version.
To download Skype, click here.
Once the file is downloaded, double-click the icon to start the install process. Follow the prompts to complete the installation.
Once the program is installed and you open it, you'll be asked to check the sound and video settings. Once that's done, you'll need to add others with Skype to your address book. You can search for them using the built in search tool or just ask your friends and relatives for their skype names and add them. If they're a little more tech savvy, you can also give them your skype name and ask them to add you.
When you add somebody to your Skype contact list, a message is sent to the other person asking for you to confirm it's okay. This way you're only adding people to your contact list you want.
Once you have a contact or two, you need to make sure that person is online so you can contact them. Skype will tell if the other person is online. If you like, you can also schedule a call with somebody in advance to make sure you're both online at the same time.
For more help with Skype, click here.
Although you don't need to have a web cam to use Skype, it is recommended. Without the web cam, all you can do is chat over the internet as if you were talking on a telephone. So at very least you will need a microphone connected to your computer to chat. And if you prefer, you can purchase a special headset/microphone combo specifically designed to work with Skype.
Webcams aren't that expensive these days and having one allows you to actually see the person (or persons) you're chatting with real-time (and vice versa). The cool thing about this is that it's almost like being there in person! Many of my clients feel as though they get to watch their distant grandchildren grow because of Skype.
If you have a lot of relatives and friends that live in other states or counties, you'll really enjoy Skype. And it's easy to install and set up.
Here's what you need for Skype:
- A computer (obviously) with a good high-speed internet connection (note some folks on DSL have trouble)
- A microphone and speakers (or headset) ... or a web cam (which typically has the microphone built in)
Installing Skype:
Installing Skype is pretty easy. You'll have to set up a free account first, then download the software and install it. I recommend keeping notes of the username and password you setup for future reference. In addition to the free account, Skype also offers a premium account for a small fee. You can read about the differences in accounts on the Skype website.
If you previously had Skype installed and can't get the program to work anymore, you might want to uninstall Skype and then reinstall the latest version.
To download Skype, click here.
Once the file is downloaded, double-click the icon to start the install process. Follow the prompts to complete the installation.
Getting Started with Skype:
Once the program is installed and you open it, you'll be asked to check the sound and video settings. Once that's done, you'll need to add others with Skype to your address book. You can search for them using the built in search tool or just ask your friends and relatives for their skype names and add them. If they're a little more tech savvy, you can also give them your skype name and ask them to add you.
When you add somebody to your Skype contact list, a message is sent to the other person asking for you to confirm it's okay. This way you're only adding people to your contact list you want.
Once you have a contact or two, you need to make sure that person is online so you can contact them. Skype will tell if the other person is online. If you like, you can also schedule a call with somebody in advance to make sure you're both online at the same time.
For more help with Skype, click here.
Monday, November 14, 2011
Finding Duplicate Photos
One of the questions I'm frequently asked is how to find and delete duplicate photos. Most people are looking for a great program that will automate the process for them. And while you can by software programs to do the job, I've never trusted them too much.
In the age of digital photography, photos are often irreplaceable and the last thing I want to do is accidentally delete photos I'd like to keep. For this reason, I always prefer to find and delete duplicate photos manually.
And one of the easiest and quickest ways to do this, is to search your entire hard drive for all photos using the "search" or "find" tool in Windows. You don't even have to know the name of each photo. You can tell Windows to search for all JPG or BMP or GIF files on your computer and then sit and wait for the results.
Here's the steps to search for duplicate photos on your computer:
For computers running Windows Vista or 7, follow the steps below to find duplicate photos:
Note also, that it may be a good idea to check the file sizes before deleting duplicate images. This will help you make sure you delete the smaller image (if one exists) and save the higher resolution image. You can check file sizes by resting your cursor over the image and reading the information box that pops up. Note that for most users having duplicate images of different file sizes may not be a problem. But for those of us that do a lot of photo editing, it may be.
Once you go through the steps a few times, you'll find this process really isn't too time consuming. But the nice thing is that you have total control over which pictures are deleted as opposed to trusting a software program to delete the right photos.
In the age of digital photography, photos are often irreplaceable and the last thing I want to do is accidentally delete photos I'd like to keep. For this reason, I always prefer to find and delete duplicate photos manually.
And one of the easiest and quickest ways to do this, is to search your entire hard drive for all photos using the "search" or "find" tool in Windows. You don't even have to know the name of each photo. You can tell Windows to search for all JPG or BMP or GIF files on your computer and then sit and wait for the results.
Here's the steps to search for duplicate photos on your computer:
- Click the START button on select SEARCH (WinXP)
- Click the PICTURES, MUSIC, OR VIDEOS link and then place a check mark in the PICTURES box
- Sit and wait for results
- View the images in thumbnails so you can see them better. To do this, click VIEW on the menu and then THUMBNAILS.
- Also a good idea to re-arrange the images by name. To do this, click VIEW on the menu and then ARRANGE ICONS BY, and then NAME.
For computers running Windows Vista or 7, follow the steps below to find duplicate photos:
- Click the START button and in the search box below type, *.jpg (and hit enter)
- You can change the size of the thumbnails by clicking the "Change Your View" icon on the right side of the window. Click the down-arrow and select the size of the thumbnail you'd like see.
Note also, that it may be a good idea to check the file sizes before deleting duplicate images. This will help you make sure you delete the smaller image (if one exists) and save the higher resolution image. You can check file sizes by resting your cursor over the image and reading the information box that pops up. Note that for most users having duplicate images of different file sizes may not be a problem. But for those of us that do a lot of photo editing, it may be.
Once you go through the steps a few times, you'll find this process really isn't too time consuming. But the nice thing is that you have total control over which pictures are deleted as opposed to trusting a software program to delete the right photos.
Wednesday, September 21, 2011
Moving Column's & Rows in Excel 2010
Ever wanted to move an entire column or row of data in an excel spreadsheet without over-writing data in another column or row? Well, you can! And here's how!
 Open your excel spreadsheet. I'm assuming you have some columns (or rows) set up already with data in them.
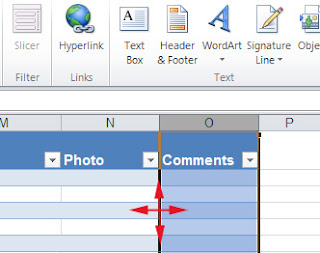
Let's say you'd like to move Column O and place it before Column N. To do this, you need to highlight column O first by single left-clicking on the column header (on "O" in this case). The example shows the column already highlighted.
Next, hold down the SHIFT key and move your mouse over the line between column N and O. When you do, your mouse cursor will change to a cross like that shown on red in the example.
Note that your cross will NOT be red or even this big. It will be small and black. I only made it red and bigger in this example so you could see it better.
When you see the cross, left click it (you must still be holding the shift key down when you click it) and then drag the column where you want and let go of the mouse. If done properly, it should have been inserted between other columns where you specified.
If it didn't work, a mistake was made during the process. Here's a list of common mistakes:
- The shift key wasn't held down throughout the process
- The column or row wasn't grabbed in the right spot (note you can't grab the column or row from the header, you must move farther down in the row of column to grab it). If you move your mouse on the line between the rows or column, your mouse will look different if you do it on cells than if you did it on the headers.
- The mouse was released in the wrong spot (so the column didn't go where you wanted it to).
Sunday, April 3, 2011
Can't Install AVG? - Try This!
Yesterday, I tried to update AVG software on a client computer from AVG 9.0 to AVG 2011. Naturally, the first thing I did was uninstall the old AVG and then downloaded the newest version. I've done this countless times in the past without any problems ... but yesterday was a different story.
When I clicked the AVG 2011 icon to install the program, the install window opened and told me it was installing and to be patiently ... then after a couple of minutes, the window would close, and it AVG was NOT installed. I had done everything right, the new version just wouldn't install and there weren't any error messages to help me figure out why.
After much frustration, I finally found some advice from an AVG rep on a forum. And best of all, it worked! So if you're having the same problem I did, you might want to try these steps.
- Download the AVG Remover tool and run it to completely remove AVG from the system. Even though this web page says to remove certain folders after running the tool, I didn't have to do this. It's a good idea to reboot the computer after running the tool though.
- Next, download the FULL version of AVG 2011 software (not the small installer program you usually download). You'll have to know if you're computer is a 32-bit or 64-bit system and select the appropriate software to download.
Sunday, March 20, 2011
Removing Facebook Scam Apps
There's another new scam making the rounds on Facebook tonight. This one is a new "Teacher from Behind"
video. These types of scams entice you with provocative messages to click on their links and then gain access to your profile information. Other similar Facebook scams include:
If however, you find that you or one of your friends have clicked a scam link on Facebook, here's what you need to do:
video. These types of scams entice you with provocative messages to click on their links and then gain access to your profile information. Other similar Facebook scams include:
- See Who's stalking you on Facebook
- Valentine's Day Scam
- Japanese Tsunami video
- Guy that Lives on my street killed his girlfriend today
If however, you find that you or one of your friends have clicked a scam link on Facebook, here's what you need to do:
- Log into your Facebook account
- In the blue navigation bar, click ACCOUNT and then PRIVACY SETTINGS
- Next to "Apps You Use" is a button that reads, EDIT SETTINGS (click this button)
- Scroll down the list and find the scam application and click the "X" to remove it. Feel free to remove any other applications you may no longer be using.
Saturday, March 19, 2011
Opting Out of Facebook Advertising
Once again, Facebook has made a change to their which affects every user. Free sites (like Facebook) often depend on Advertising for income. While most of us understand and accept this, the problem is that Facebook can use your photos and information in their ads. I wrote a post a while back when Facebook announced changes to their advertising. At the time, it appeared that there would be no way for users to opt out of having their photos used in the ads. Now there does appear to be some control for users. Some of your friends may have posted the status message below:
This message tells you how to opt out of Facebook's new advertising feature. Here's the steps again:
For more information about Facebook Privacy, click here.
Today, Facebook will start using your photos in ads that will appear on the profile page of your contacts. It's legal and is mentioned in the fine print when you create your account. TO stop this do the following: Account, Account Settings, Then click on Facebook Ads ( tab...), choose "No one" on the drop-down menu and save changes. Copy this and use in a status update
This message tells you how to opt out of Facebook's new advertising feature. Here's the steps again:
- Log into Facebook
- On the blue menu bar click ACCOUNT and then ACCOUNT SETTINGS
- Click the tab on the far right that reads, FACEBOOK ADS
- Close the Pop-up window that appears.
- Use the drop-down menu to select NO ONE and then save the changes.
For more information about Facebook Privacy, click here.
Wednesday, March 9, 2011
Setting Up a New Computer
Whenever you get a new computer, there are some things you should do to it before you really start using it. Below is a list of the things I do on every new computer I set up. I do all of these these things before I transfer back up and transfer data from an old computer to the new computer.
First things first, get yourself 3 or 4 blank DVD-R’s or DVD+R’s and use the built in program to create the emergency recovery disks. This takes about a half hour to do, but should be done before you do anything else on the computer. These disks will put a copy of your operating system on it and should be saved in cases for emergency purposes (i.e, your computer crashes and won’t start).
Once that’s done, you’ll want to download the following free software and install it.
One more thing I would do (especially if you have a laptop), is create a document to save your important product keys and other info in. And if your laptop has a Windows 7 sticker on the bottom of it (as well as service tag or express code), you’ll want to be sure to include the Win7 product key, and any express or service codes in this docs. These labels then to wear off, so I like to get them written down as soon as possible.
This may seem like a lot to do, but they will help with the overall health of your new computer.
First things first, get yourself 3 or 4 blank DVD-R’s or DVD+R’s and use the built in program to create the emergency recovery disks. This takes about a half hour to do, but should be done before you do anything else on the computer. These disks will put a copy of your operating system on it and should be saved in cases for emergency purposes (i.e, your computer crashes and won’t start).
Once that’s done, you’ll want to download the following free software and install it.
- All Windows updates (there will be a link in your All programs menu)
- Adobe Reader (be sure to uncheck any toolbars that it wants to install)
- Java (uncheck toolbars)
- Quicktime
- Malwarebytes AntiMalware
- Flash player (you’ll have to open Internet explorer and search google to do this, then follow prompts)
- I would also download and install Firefox – and then install flash player in it by opening Firefox, searching google for flash player and following prompts)
- If you want iTunes
on it, you’ll have to make sure and download the 64-bit version of it
- If the computer comes with McAfee, I would uninstall it in the control panel and install Norton or AVG
One more thing I would do (especially if you have a laptop), is create a document to save your important product keys and other info in. And if your laptop has a Windows 7 sticker on the bottom of it (as well as service tag or express code), you’ll want to be sure to include the Win7 product key, and any express or service codes in this docs. These labels then to wear off, so I like to get them written down as soon as possible.
This may seem like a lot to do, but they will help with the overall health of your new computer.
Monday, March 7, 2011
Changes to Qwest Internet
If you use Qwest internet, you have received an email from them recently stating that they were ending their partnership with MSN email and that you needed to make some changes before June 30, 2011. The email is a bit confusing, so I thought I'd help explain it here.
If your bundled your TV, Phone, and internet with Qwest , then MSN was probably installed in your computer during the setup process. That's because Qwest had an agreement with MSN where Qwest provided the internet service, and MSN could provide the email service. Although you never needed to use MSN email if you didn't want to, many folks did because the setup process made it look like you did.
However, now that Qwest and MSN are going their separate ways, folks will have to make some changes to their email in order to ensure they keep getting email after June 30, 2011. And the changes depend on your current email address.
If you were using MSN for email, your email address is something like "example@msn.com". If your email address looks like this, then you'll have to make a choice.
For more information about the Qwest changes, click here.

If your bundled your TV, Phone, and internet with Qwest
However, now that Qwest and MSN are going their separate ways, folks will have to make some changes to their email in order to ensure they keep getting email after June 30, 2011. And the changes depend on your current email address.
If you were using MSN for email, your email address is something like "example@msn.com". If your email address looks like this, then you'll have to make a choice.
- If you want to keep your existing email address, you'll have to sign up (and pay) for a Premium MSN account. So you'll not only be paying for Qwest internet, but also MSN email.
- You could switch to a "example@q.com" email address and use the new Qwest internet system.
- You could sign up for a free Gmail, Yahoo, or Hotmail email account and use it instead (the advantage of doing this is that your email address will stay the same if you ever change your internet provider in the future).
For more information about the Qwest changes, click here.
Friday, March 4, 2011
Microsoft Office 365 - Sharing in the Cloud
Microsoft and Google are in a battle to be king of "the cloud". Both offer users a way to create, edit and share office docs online, but features vary a bit.
Microsoft Office 365 is Microsoft's online "cloud" services. It's not another version of Microsoft Office software, but rather a way for users of Microsoft Office 2003, 2007 and 2010 to share documents with co-workers online. Microsoft Office 365 was developed for business users (not home users).
Folks with Office 2003 and 2007 will have limited capability in the cloud ... businesses are encouraged to upgrade to Microsoft Office 2010 Professional for a better cloud experience.
For more information about Office 365, there's a book on Amazon.com that you can purchase called, Microsoft Office 365: Connect and Collaborate Anywhere, Anytime
For more information about Microsoft and Google's battle over the cloud, click here.
Microsoft Office 365 is Microsoft's online "cloud" services. It's not another version of Microsoft Office software, but rather a way for users of Microsoft Office 2003, 2007 and 2010 to share documents with co-workers online. Microsoft Office 365 was developed for business users (not home users).
Folks with Office 2003 and 2007 will have limited capability in the cloud ... businesses are encouraged to upgrade to Microsoft Office 2010 Professional
For more information about Office 365, there's a book on Amazon.com that you can purchase called, Microsoft Office 365: Connect and Collaborate Anywhere, Anytime
For more information about Microsoft and Google's battle over the cloud, click here.
Thursday, March 3, 2011
Sharing Photos in the Cloud
After seeing the commercials on TV, several folks have asked me for more information about "the cloud" ... specifically, what is it and can it help them?
The "cloud" is it is commonly called, is the internet. The goal of "the cloud" is to make it easier for people (mainly businesses) to work on and share files. From a business perspective, multiple users can access the same file (because it's stored on a server) through the internet. They can work on it and share it with co-workers because they too have access to "the cloud".
Google Docs can be considered in the cloud because Google offers a central location where people can create various documents (comparable to Microsoft office documents) online and share them with others. These documents can be private, shared with people you choose, or made public (for web sharing). Folks just need a Google account (which is free) to use Google Docs.
I use Google's Calendar on one of my websites as a means of sharing trout fishing events around the world. The calendar is public so anybody can see it. The cool thing is that I add events to my calendar (through my Google account) and the changes automatically appear on my web site. If I wanted to, I could make the calendar private and grant access to a few people so only we could see and edit it.
So while the benefits of using the cloud for businesses may seem clear, many wonder if the cloud can help the average home computer user ,,, which is a good question.
Microsoft touts that Windows 7 gives home users access to "the cloud" as a means of sharing photos, movies, and office docs. For most home users, sharing office docs may not be the top priority. But sharing photos and movies can be useful.
Windows 7 comes with a program called, Windows Live Gallery. This program is a tool to view and arrange photo... and it has built in social sharing buttons. To learn more about Windows Live Gallery and sharing photos, click here.
Windows Vista users can download Windows Live Essential to accomplish the same thing. If you'd like to give Microsoft's cloud a try, click here.
Wednesday, February 23, 2011
Having Problems Connecting Yahoo Mail?
For months now, many of us have had problems connecting our Yahoo Email. We've clicked our Yahoo Email shortcut in our favorite internet browser and then after practically and eternity, we finally see a blank white screen that reads, "Unable to Connect". Then a few hours later, we can get in. And if that wasn't frustrating enough, some of our friends aren't having problems at all.
Troubleshooting intermittent problems like these are challenging. But last night I happen to be paying a little more attention and noticed one minor detail. The shortcut I was clicking on pointed to a different location then the actual address where my email was stored. In other words, it looks like Yahoo moved my email account to another server and my shortcut was still pointing to the old server.
Since the old shortcut worked part of the time (but not all), I'm guessing Yahoo put a redirect in place so that when the old shortcuts were clicked, they would be redirected to the new servers ... but I'm guessing the redirect wasn't always working (which is why my problem was intermittent).
So next I deleted my old shortcut and used Google to get back to my Yahoo email and created a new shortcut. So far that seems to have solved all of my Yahoo connection problems.
Saturday, February 19, 2011
Use Caution When Posting on Facebook
You probably noticed that a few of your Facebook "friends" will post just about anything that pops into their head. Often times the posts are full of profanity and other vulgarities. This seems to be especially true with younger people.
Very few people consider the potential consequences when posting on Facebook. The first thing to keep in mind is that everything you post gets stored in a database FOREVER! You can delete old posts and photos from your facebook account .... but they will still remain in Facebook's database. Here's a great article on just how long things remain in Facebook's database.
Another thing to keep in mind is that others are searching Facebook for more information about you. It's becoming commonplace for future employers, colleges and others to search Facebook accounts to determine if you're the right sort of person they'd like to admit into their organization. And of course, lawyers and law enforcement will also search Facebook in the event a crime is committed.
If you have kids, nephews, nieces, etc. .... it's a good idea to teach them to keep things in mind when posting. For more information about the potential dangers of Facebook posting, click here.
For more information about your Facebook privacy, click here.
To learn how to stop Facebook from sharing your information on Google, click here.
Wednesday, February 16, 2011
Like Chess?
Chess was one of my favorite games growing up. It was the one game I could get my grandpa and the other men in our family to play. It was the game we could match wits on. Not only did we play chess, but we also used to make our own chess boards and then buy the pieces to go with the new board. It was fun collecting different sets. I still have the boxed chess board that me and my grandpa made over 20 years ago.
One of my good friends who shares the passion for chess, has started her own website selling chess sets over the internet. It's a great site to find different chess sets, boards, tables, etc. The Word Wide Chess Sets web site also carries Cribbage, Backgammon, Chinese Checkers, and Dominoes too!
They even have a computer chess game that is completely portable (so it's great for traveling). Nice way to keep yourself or the kids entertained on those long road trips and flights.
Check it out .... Word Wide Chess Sets (and like I said, the site is owned by a good friend, so it's completely trustworthy)!
Internet Marketing Link Woes
While not all of my clients are interested in internet marketing, many are so I thought I would share this article. There's a lot of Do's & Don'ts where internet marketing is concerned and if you're not careful, you'll find yourself penalized by the search engines (like Google) for employing the don'ts ... as JC Penny recently discovered.
Search engines love links into a website. The more the better. But the catch is that these links have to natural links ... in other words, other sites are linking to yours to share valuable (and related) content with their readers. If you manipulate the system, you can get into trouble. This is why generic link exchanges are typically considered bad practices.
JC Penny hired an SEO firm to boost their site's rankings and the firm engaged in black hat tactics to set up pages with links to JC Penny. In short, they tried to manipulate the system to bring more links to the JC Penny website. It's not clear if JC Penny knew what was their SEO firm was doing - but none the less, JC Penny has been penalized by Google by it.
Click here to read the full article.
Friday, February 11, 2011
Send & Receive Faxes Through Email
This may sound like a lot of money to some ... but when you consider the fact that you no longer need a fax machine, second line, or have to pay for ink and paper, the fee sounds pretty reasonable.
Most home users don't fax enough enough to warrant the cost. But folks running a small business may want to take a look at this service (especially if you're running the business the from your home).
Although email is popular, many people still rely on faxing as a means of communication. That's because they have fax machines instead of scanners and it's quicker and easier to fax something than to scan it into the computer and email it. Faxing is also more secure than emailing. So the need to send and receive faxes won't be going away any time soon.
Many small businesses don't currently offer faxing because of the expense (cost of fax machines, second lines, ink, paper, etc.). This is a great alternative for these people. Another advantage of using a service like MyFax.com is that because you can receive faxes via email, you don't have to be in the office to receive and read your faxes. You can read them on your cell phone (if you pay for internet service) while you're out and and about. So you don't have to worry about missing an important fax.
Many of my clients have asked how they can send and receive faxes through email, and until now, I didn't have a solution for them. If this is something, you'd like to do, check out MyFax.com - Faxing Simplified, Anytime, Anywhere! Get a MyFax Number
Tuesday, February 8, 2011
Online Chat Support
Getting tech support for various computer problems has become very frustrating for many. Not only do you usually end up on hold for long periods of time, but then you end up talking to somebody in India whose accent is so thick you have hard time understanding them. So now you not only have a computer problem, but a language barrier problem with the person trying to help you. Frustrating indeed!
For these reasons, I will always contact tech support via their online chat system before using the phone. Another advantage of the chat support system is that tech support can connect remotely to your computer if needed so they can see the problem first hand and even make changes for you.
Not every corporation has online chat support, but many do. Despite this, finding their chat links can be challenging so I thought I would list them here. Just click the links below to go to the appropriate chat support page.
Qwest Online Chat Support
Note that I only listed the most commonly needed chat support systems here. There are more. So if you don't see your link above, search Google. Also, keep in mind that if you're needing help with free software (like AVG, Avast, etc., that most of these sites don't offer online chat tech support. Instead, you can find help in their community forums).
For these reasons, I will always contact tech support via their online chat system before using the phone. Another advantage of the chat support system is that tech support can connect remotely to your computer if needed so they can see the problem first hand and even make changes for you.
Not every corporation has online chat support, but many do. Despite this, finding their chat links can be challenging so I thought I would list them here. Just click the links below to go to the appropriate chat support page.
Dell Technical Support (other contact options)
Lexmark Support (no online chat)
McAfee Support (live chat button on top right corner of page)
Qwest Online Chat Support
Note that I only listed the most commonly needed chat support systems here. There are more. So if you don't see your link above, search Google. Also, keep in mind that if you're needing help with free software (like AVG, Avast, etc., that most of these sites don't offer online chat tech support. Instead, you can find help in their community forums).
Monday, January 31, 2011
Open Office - The Alternative to Microsoft Office
Since typewriters are virtually obsolete, we all need a word processing program today. Every computer running Windows has a program called Wordpad installed, which is the most basic word processing program you can get. The problem with Wordpad though is that it's so basic, that it lacks a lot of needed features.
Microsoft Works is another program that comes pre-installed on most new computers today. Works is similar to Microsoft Office in that its a suite of office software. However, because it's typically free, it's not as good as the full featured Microsoft Office suite (which is still "king" in office suite software). Microsoft Works Word is a better program than Wordpad, but still not as good as Microsoft Word.
If you can afford Microsoft Office, it's still the preferred choice for office software. However, if money is tight, there is an alternative. It's called, Open Office.
Open Office is FREE and is a complete suite of office software. It's very comparable to Microsoft Office. And better yet, you can open Word and Excel documents in Open Office and edit them. This is a HUGE plus!
Because Open Office was designed to look and feel like Microsoft Office, it's pretty intuitive to use. The only trick is getting used to the names of individual programs. For example, the word processing program in Open Office is called, Writer (instead of Word). The spreadsheet program is called, "Calc" (instead of Excel). Open Office even has a PowerPoint counterpart called, Impress. Here's the complete suite of programs that comes with Open Office:
- Writer (similar to Microsoft Word)
- Calc (similar to Microsoft Excel)
- Impress (similar to PowerPoint)
- Base (similar to Access)
- Draw (a graphics program which is better than Paint).
Friday, January 28, 2011
Configuring WordBB to work with MyBB
WordBB is a Wordpress plugin designed to bridge MyBB and Wordpress together. The purpose of doing this is so they work together. It's a way to integrate your existing MyBB forum into your Wordpress site.
If you already have a Wordpress site, installing the plugin is easy. Just log into your WP site and click the plugins link and then "add new' and search for "wordbb". Once you find it, you can install and activate it.
Then comes the tricky part.
Once WordBB has been installed and activated, you'll have to click the links that reads, "WordBB Options" to configure it. And in order to configure it, you'll need to have some information handy (namely, the details of your database setup - that is, the database you setup during your MyBB installation).
Hopefully, you kept some notes during the installation process to make it easier to retrieve this information. If you didn't, you'll have to log into your web host account and look up the details of your database. Here's what you need to know:
There is one other thing you'll need to complete the WordBB configuration and this is where most people get hung up.You'll need to know is the "MyBB Absolute path on the server".
The easiest way to get this piece of information is to create a PHP file and paste some code into it and upload it to your server in the MyBB root folder (i.e., the folder you installed MyBB to). This PHP file (when executed) will tell you what the absolute path is. So here's what you do.
Open you're favorite web editing software (I use Dreamweaver) and create a new PHP file. Name the file "rootchecker.php" and save it to the same folder you installed MyBB to. I installed MyBB to a folder named, "forum" on my root directory, so that is where I saved the rootchecker.php file to.
Now copy the code below and then paste it into the rootchecker.php file just after the tag. Then save the file and upload it.
Once the rootchecker.php file has been uploaded, open your internet browser and type in the URL (being sure to replace "yourdomain.com" with your actual domain name). :
You'll see a string of text when you're done. That text is the path to your root folder. Copy that entire string of text and paste it on the "MyBB absolute path on server" field on the WordBB Options page and save the changes.
If you see an error message saying, "can't find global.php file' after saving the changes, you'll have to follow the steps below.
First re-open your "rootchecker.php" file and find the code previously pasted into it and remove it. In it's place, copy and paste the code below:
Save the file and reupload it. Then open your internet browser again and go back to the URL mentioned above (http://www.yourdomain.com/forum/rootchecker.php). Once again you'll see a string of text. Copy and paste this text into the "MyBB absolute path on server" and save. Hopefully you won't see any more error messages.
If you already have a Wordpress site, installing the plugin is easy. Just log into your WP site and click the plugins link and then "add new' and search for "wordbb". Once you find it, you can install and activate it.
Then comes the tricky part.
Once WordBB has been installed and activated, you'll have to click the links that reads, "WordBB Options" to configure it. And in order to configure it, you'll need to have some information handy (namely, the details of your database setup - that is, the database you setup during your MyBB installation).
Hopefully, you kept some notes during the installation process to make it easier to retrieve this information. If you didn't, you'll have to log into your web host account and look up the details of your database. Here's what you need to know:
- The name of your MySQL database that was set up during MyBB installation.
- The username for that database
- The password for the database
- The Host Server for the database
There is one other thing you'll need to complete the WordBB configuration and this is where most people get hung up.You'll need to know is the "MyBB Absolute path on the server".
The easiest way to get this piece of information is to create a PHP file and paste some code into it and upload it to your server in the MyBB root folder (i.e., the folder you installed MyBB to). This PHP file (when executed) will tell you what the absolute path is. So here's what you do.
Open you're favorite web editing software (I use Dreamweaver) and create a new PHP file. Name the file "rootchecker.php" and save it to the same folder you installed MyBB to. I installed MyBB to a folder named, "forum" on my root directory, so that is where I saved the rootchecker.php file to.
Now copy the code below and then paste it into the rootchecker.php file just after the tag. Then save the file and upload it.
echo $_SERVER['DOCUMENT_ROOT'];
?>
Once the rootchecker.php file has been uploaded, open your internet browser and type in the URL (being sure to replace "yourdomain.com" with your actual domain name). :
http://www.yourdomain.com/forum/rootchecker.php
You'll see a string of text when you're done. That text is the path to your root folder. Copy that entire string of text and paste it on the "MyBB absolute path on server" field on the WordBB Options page and save the changes.
If you see an error message saying, "can't find global.php file' after saving the changes, you'll have to follow the steps below.
First re-open your "rootchecker.php" file and find the code previously pasted into it and remove it. In it's place, copy and paste the code below:
Save the file and reupload it. Then open your internet browser again and go back to the URL mentioned above (http://www.yourdomain.com/forum/rootchecker.php). Once again you'll see a string of text. Copy and paste this text into the "MyBB absolute path on server" and save. Hopefully you won't see any more error messages.
Thursday, January 27, 2011
Firefox Plans to Develop a New Privacy Tool
Most know their movements are tracked while they surf the web (primarily for advertising reasons) and some of us even use additional software tools to help reduce of that tracking. One of tools I use is Firefox (instead of Internet Explorer). With Firefox, I have a little more contrrol over my privacy and advertising.
For those who don't know what Firefox is, it's an internet browser (like Internet Explorer). I've been using it for years, but only started recommending it to my clients in past couple of years. Before Internet Explorer 7 was released, Firefox confused a lot of people. But now that Microsoft has copied Firefox (with the release of IE7), more and more people are comfortable using it.
The new "Do Not Track" feature (when enabled) will basically tell web sites that you've opted-out of online advertising behavior. In response, they're not supposed to track your movements through their site for advertising purposes.
No doubt, some sites will try to counteract this feature by posting messages that some features of their site may not function properly with the "do not track" feature enabled. My response .... ignore the messages. As long as you're seeing and doing what want a web site, there's no reason to disable the feature.
For more information about the "Do Not Track" privacy tool in Firefox, click here.
Wednesday, January 26, 2011
Facebook Plans to Invade Your Privacy Again
Many Facebook users are already concerned about their privacy issues, but once again, Facebook doesn't seem to care.
As if they weren't already making enough money, they now plan to use you in their ads. So every time you "like" a certain a product or "check in" to one of your favorite local coffee shops, etc., you risk having your profile connected with that merchant and published in one of FB's ads. In Facebook's own words ....
For more information about Facebook's plans to use you in their Ads, click here.
As if they weren't already making enough money, they now plan to use you in their ads. So every time you "like" a certain a product or "check in" to one of your favorite local coffee shops, etc., you risk having your profile connected with that merchant and published in one of FB's ads. In Facebook's own words ....
"Facebook said the sponsored stories are all labeled as such. Users won't get any special notification that their posts have been sponsored and used as ads, and there's no option for users to opt out of the service".The fact that FB users won't even be able to "opt-out" of this feature is really upsetting. It will be interesting to see if Facebook does and about face on this one as users voice their complaints.
For more information about Facebook's plans to use you in their Ads, click here.
Tuesday, January 25, 2011
Comparing Computer Processors
Most people know that when buying a new computer, it's important to look at the CPU speed and the amount of RAM (Memory) is installed. But start talking about different type of processors, and confusion quickly sets in.
Intel and AMD are the two biggest manufacturers of Computer Processors (CPU's) and for the average consumer, it really doesn't matter much today which one you get. This isn't true for online gamers where speed is very important. But for the rest of us, who don't want to spend top dollar for the latest and greatest processor and don't need nano-second speed advantages ... the average CPU is usually sufficient.
For those who do care, there is a great site with side by side comparisons of CPU benchmark tests that you may find useful.
Sunday, January 23, 2011
Forcing WWW to Show in URL in Wordpress
Wordpress is a great place to host a blog, but it does have its frustrations. I won't go into them all here, but one thing that I and others have found very frustrating is forcing the web address to show 'www' before the domain name.
Why is this important? There are several reasons. First, search engines don't like it when a website's address will sometimes show as www.example.com and other times it shows as example.com. Search engines will sometimes view this as two different websites with duplicate content. The easiest way to fix this is to force the URL to always show the www before the domain name.
Some Wordpress Plugins (like S2Member) also require the 'www' in the URL in order to function properly. The trick, however, is getting the job done.
If you search the web, you'll find a plethora of information about how to force the www in the URL. Some sites suggest editing the HTACCESS file. This may or may not work depending on your setup, but it didn't work for me.
I also tried calling tech support for my host (GoDaddy.com) for help in reconfiguring the CNAME in the Domain Manager. This didn't work either. The good folks at GoDaddy informed me that things were set correctly to force the www on the server, but that Wordpress was overwriting their configuration.
After hours of frustration of trying every suggestion on the web, I finally found the answer in the Wordpress settings (and you wouldn't believe how simple it was to fix)! Here's how I fixed the problem.
- Log into Wordpress
- On the left side of the screen, scroll down to SETTINGS and click GENERAL
- Change the Wordpress Address URL) to www.example.com (replacing example.com to your domain)
- Change the SITE URL to www.example.com (replacing example.com with your domain)
- Scroll down and click the blue SAVE CHANGES button
Thursday, January 20, 2011
Check Out the New How To Section!
Although I've made an effort to give detailed instructions on how to do things on the computer in the past, I've thought it might make things easier to setup a page with links to some those posts.
You can (and should) still use the search feature on this blog, but I hope the new page will help answer some of the more common questions more quickly.
I even added the new page in the navigation menu, so all you have to do is click the "How To" button to get immediate access to the links.
I'll do my best to add to remember to add to the list every time I create a new "how to" post, but just in case you can't find what you're looking for, don't forget to use the search feature.
Saturday, January 15, 2011
What's Wrong With the iPad?
While iPads continue to be the latest craze (next to the iPhone), I've recently come across a few articles that I thought you might be interested in. I've played with the iPad a few times and don't own one. So my knowledge and opinion of them is limited. At first glance, they are cool and fun to use and the portability makes them great for easy carry along.
But like anything else, once you spend some time getting to knows the ins and out of a device, you get a better feel for works great and what doesn't. These articles share a bit more insight into problems (or complaints) about the iPad.
But like anything else, once you spend some time getting to knows the ins and out of a device, you get a better feel for works great and what doesn't. These articles share a bit more insight into problems (or complaints) about the iPad.
By the way, if you're interested in alternatives to iPad, here's an article detailing iPad's 12 biggest competitors.
Acer is also working on it's own version of the iPad. This one (compared to the others) looks the most interesting to me.
Wednesday, January 5, 2011
Troubleshooting Printer Problems
Printer problems are one of the more frustrating issues we computer users sometimes have to deal with. That's because most of us only have one printer attached to the computer and when we need to print something, we typically need it now.
There are many different things can cause printer problems, but regardless of the problem, the basic steps to troubleshoot the problem are the same. Hopefully the steps below will help solve your problem. If they don't, you may need to contact technical support for further help.
First things first .....
Look for error messages on the computer or the printer itself. These messages can help you find the cause immediately. Some of the common error messages you may see include paper jam or no ink. Some printers only have flashing lights to indicate problems. Your printer manual should be able to help you decipher what the flashing lights mean. If you don't have your printer manual (or can't find it), you should be able to download a copy of it on the manufacturer's website.
Listen to the printer. If you hear the printer trying to print, then you know the computer is talking to the printer and that the problem is in the printer itself. It may be that the printer is out of paper, or the paper isn't feeding correctly. if you don't hear anything, the printer is either off (or really dead) or the computer may not be talking to the printer (which requires further troubleshooting).
The next step is to check the printer queue. Every time we click the print button, the print job is sent to the queue and when the printer isn't working, these print jobs can pile up (causing more problems). Checking the print queue will reveal backlogged print jobs ... and if there are any, you'll want to delete them all. Follow the steps below to check the print queue.
Power-Cycling the Printer is another good troubleshooting step when having printer problems. Doing so re-initializes the printer and can clear up some issues. You can also reboot the computer. Sometimes it's best to shut down the computer, then power-cycle the printer, and then start the computer back up. This helps to re-establish communication between the two.
Check the Manufacturer's web site for more help. Most manufacturer web sites have a good support section that details common problems and how to fix them. They may also offer software patches to fix known technical issues. This step may be too advanced for some people, but this is still an option.
Uninstalling your printer's software and reinstalling is another option ... although, I typically consider this a last resort. If you do decide to try this, be sure to uninstall through the control panel. If you don't have your printer disk, you can download the software from the manufacturer's web site. Be sure to get the software that matches your operating system (Winy7, Vista, XP, etc.) and System Type (32 or 64 bit).
Ink Problems are another common issue all together. Most of these problems can be solved by cleaning the print heads, removing the tape on the ink cartridge, reseating ink cartridges, or changing cartridges all together. Your printer manual can help you accomplish these tasks.
These steps won't fix every printer problem, but they do fix the majority of them. And with luck, they'll fix yours as well.
There are many different things can cause printer problems, but regardless of the problem, the basic steps to troubleshoot the problem are the same. Hopefully the steps below will help solve your problem. If they don't, you may need to contact technical support for further help.
First things first .....
Look for error messages on the computer or the printer itself. These messages can help you find the cause immediately. Some of the common error messages you may see include paper jam or no ink. Some printers only have flashing lights to indicate problems. Your printer manual should be able to help you decipher what the flashing lights mean. If you don't have your printer manual (or can't find it), you should be able to download a copy of it on the manufacturer's website.
Listen to the printer. If you hear the printer trying to print, then you know the computer is talking to the printer and that the problem is in the printer itself. It may be that the printer is out of paper, or the paper isn't feeding correctly. if you don't hear anything, the printer is either off (or really dead) or the computer may not be talking to the printer (which requires further troubleshooting).
The next step is to check the printer queue. Every time we click the print button, the print job is sent to the queue and when the printer isn't working, these print jobs can pile up (causing more problems). Checking the print queue will reveal backlogged print jobs ... and if there are any, you'll want to delete them all. Follow the steps below to check the print queue.
- Click the START button and then CONTROL PANEL
- Open the PRINTER folder
- Double-left click on your printer icon (a new window opens)
- If there are any print jobs queued, they will show up on the window. When troubleshooting the printer, you want to delete all of these print jobs. To do this, single-left click a job (to highlight it) and then click DOCUMENT and CANCEL on the window's menu. Repeat the process for every print job.
- Once the print queue is empty, it wouldn't hurt to reboot the computer as well as power-cycle the printer.
Power-Cycling the Printer is another good troubleshooting step when having printer problems. Doing so re-initializes the printer and can clear up some issues. You can also reboot the computer. Sometimes it's best to shut down the computer, then power-cycle the printer, and then start the computer back up. This helps to re-establish communication between the two.
Check the Manufacturer's web site for more help. Most manufacturer web sites have a good support section that details common problems and how to fix them. They may also offer software patches to fix known technical issues. This step may be too advanced for some people, but this is still an option.
Uninstalling your printer's software and reinstalling is another option ... although, I typically consider this a last resort. If you do decide to try this, be sure to uninstall through the control panel. If you don't have your printer disk, you can download the software from the manufacturer's web site. Be sure to get the software that matches your operating system (Winy7, Vista, XP, etc.) and System Type (32 or 64 bit).
Ink Problems are another common issue all together. Most of these problems can be solved by cleaning the print heads, removing the tape on the ink cartridge, reseating ink cartridges, or changing cartridges all together. Your printer manual can help you accomplish these tasks.
These steps won't fix every printer problem, but they do fix the majority of them. And with luck, they'll fix yours as well.
Monday, January 3, 2011
Customizing Windows Gadgets
Windows Gadgets are new feature included with Windows Vista and Windows 7. Gadgets are really Window's version of Yahoo Widgets. Gadgets are little tools you can add to your desktop. The more popular gadgets used include the weather, calender and clock.
Windows displays gadgets in an invisible sidebar on the right side of the desktop. However, this sidebar can moved to the left side of the desktop if you prefer. You can also configure Windows to start the sidebar (and gadgets) every time windows starts.
If you don't see any gadgets on your desktop, it's most likely because the sidebar is closed. The easiest way to re-enable it is to click the START button and type "sidebar" in the search field and hit enter. Then click the WINDOWS SIDEBAR link in the results.
To Configure the Sidebar to Start Every Time Windows Starts, follow the steps below:
If you add the weather gadget, you'll have to configure it to display the weather for your current location. If you rest your mouse on the right side of the icon, you'll see a little wrench (click it). Type your location (city, state) in the search field and then click the magnifying glass before clicking OK.
You can easily close gadgets you no longer want by hitting the X to the right of the gadget's icon ... or you can right click on the gadget itself and select CLOSE GADGET.
Moving Gadgets
By default, gadgets are placed in line with each other on the sidebar (which is usually displayed on the right side of the desktop). But if you prefer, you can detach any gadget and move it wherever you want it on the dektop. All you do is right-click on the gadget and select "Detach From Sidebar". Then hold the left mouse button down the gadget to drag it wherever you want it.
For more information on Windows Gadgets, click here.
Windows displays gadgets in an invisible sidebar on the right side of the desktop. However, this sidebar can moved to the left side of the desktop if you prefer. You can also configure Windows to start the sidebar (and gadgets) every time windows starts.
If you don't see any gadgets on your desktop, it's most likely because the sidebar is closed. The easiest way to re-enable it is to click the START button and type "sidebar" in the search field and hit enter. Then click the WINDOWS SIDEBAR link in the results.
To Configure the Sidebar to Start Every Time Windows Starts, follow the steps below:
- Click the START button and then CONTROL PANEL
- Double-left click the WINDOWS SIDEBAR PROPERTIES icon
- Make sure there is a checkmark in the box next to "Start Sidebar when Windows Starts"
- Click OK
If you add the weather gadget, you'll have to configure it to display the weather for your current location. If you rest your mouse on the right side of the icon, you'll see a little wrench (click it). Type your location (city, state) in the search field and then click the magnifying glass before clicking OK.
You can easily close gadgets you no longer want by hitting the X to the right of the gadget's icon ... or you can right click on the gadget itself and select CLOSE GADGET.
Moving Gadgets
By default, gadgets are placed in line with each other on the sidebar (which is usually displayed on the right side of the desktop). But if you prefer, you can detach any gadget and move it wherever you want it on the dektop. All you do is right-click on the gadget and select "Detach From Sidebar". Then hold the left mouse button down the gadget to drag it wherever you want it.
For more information on Windows Gadgets, click here.
Subscribe to:
Posts (Atom)